


Yoodley is reader-supported. When you buy through links on our site, we may earn an affiliate commission.
Laptops are one of the most portable and compact electronic devices around, and with the increasing trend of using them, you get to see different troubleshooting issues faced by these handy machines every other day.
If you own a Lenovo laptop and have been experiencing problems with its touchpad lately, this is nothing to worry about.
To fix the issue where your Lenovo laptop’s touchpad is not working, try enabling the touchpad from the Control Panel, disconnect any external devices connected to your PC, go back to the original touchpad settings for your device, update the touchpad drivers, run a Windows troubleshooter, update the Windows, etc.
We have put together a comprehensive guide for you explaining all the reasons that could interfere with your Lenovo laptop’s touchpad leading it to stop working. We will also look into some fixes you can try to get yourself out of this problem without much hassle.
Why Is the Lenovo Laptop Touchpad Not Working?
If this is your first time encountering an issue with your Lenovo laptop’s touchpad or any problem with your laptop in general, and you have no idea what are the factors triggering this, we have made a list of some of the significant causes of this for you.
Reason #1: Outdated Drivers
One of the main reasons you cannot use the touchpad on your Lenovo laptop is the outdated drivers on your device. When it comes to laptops and their internal components, you have to keep updating their drivers from time to time to ensure that all the different components remain compatible with your device.
If you have forgotten to upgrade the touchpad drivers on your laptop, this could affect the compatibility of the touchpad with your device, ultimately making it stop working.
Reason #2: Touchpad is Disabled
Though this is a common reason, during our research, we noticed a lot of users committing this mistake that eventually affected the working of the touchpad on their laptops.
Even if you haven’t disabled the touchpad on your device, you must have performed a Windows update or installed a third-party app previously that might have disabled the touchpad and other functionalities altogether. So, on the safe side, it’s better to check whether the touchpad is enabled on your device.
Reason #3: Hardware Issues
This is one problem you won’t want to be the reason behind the whole touchpad not working situation you are facing on your Lenovo laptop. In addition to all the software issues we have mentioned above, the leading cause of why your Lenovo laptop’s touchpad suddenly stopped working could be external too.
If you have recently dropped your laptop somewhere or have been careless with it in the past, this might have damaged its touchpad, eventually making it stop working on your device.
Reason #4: Problems with the Operating System
Though this isn’t a common cause for the touchpad not working on your Lenovo laptop issue but generally, most of the issues you face with your device are because of an incompatible operating system.
If you have recently updated your windows and the latest version doesn’t support the outdated version of the touchpad on your laptop, you might find it challenging to make the touchpad work on your device.
Reason #5: Problem with an External Connection
Another reason why the touchpad is not working on your Lenovo laptop is a problem with some external device you have connected to your laptop. For instance, if you are using a Mouse or keyboard via Bluetooth connection with your laptop, this external connection could interfere with the laptop’s touchpad, eventually affecting its functioning.
Fixing the Lenovo Laptop Touchpad Not Working
If you are wondering how to fix the Lenovo laptop touchpad not working issue, our 12 simple solutions will help you eliminate this problem without much hassle.
Method #1: Disconnecting External Device
As mentioned above, if your Lenovo laptop is connected to some external device, such as a Mouse or Keyboard, this connection could interfere with the working of your device’s touchpad.
To fix this problem, you can disconnect the external device from your PC, thus reviving the link of your touchpad with the laptop. Once the touchpad starts working again, you can connect the mouse or other external devices again to your laptop.
Method #2: Running Windows Troubleshooter
If you are using a Lenovo laptop with Windows 10 or Windows 11, you have a slight edge over other Windows version users. Fortunately, these latest versions of the Windows operating system come with an in-built troubleshooter.
The troubleshooter is responsible for finding the problems with your system and fixing them by running the troubleshooter on your device.
Here is how you can run the Windows troubleshooter on your Windows 10 Lenovo laptop to solve the problem with your touchpad.
- Click the “Start” icon on the taskbar and type “Control Panel” in the search bar.
- Select the first search result to open the Control Panel window on your laptop.
- Head to the “System” option and select “Security settings.”
- Find the “System and Security” subheading and choose the “Security and Maintenance” option.
- Click the “Troubleshoot common computer problems” option to open the Troubleshoot window on the screen.
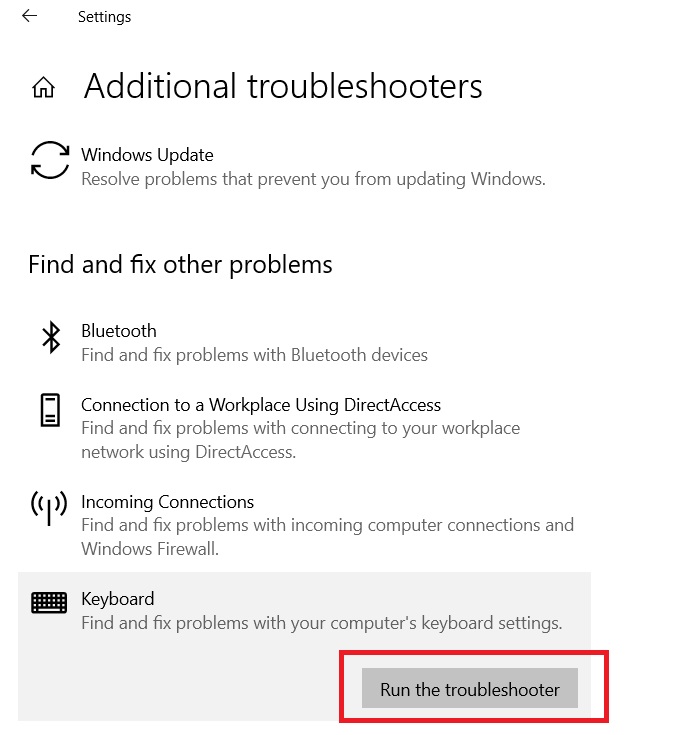
- Scroll down on the Troubleshoot window and locate the “Find and Fix other problems” options.
- Choose “Keyboard” and click the “Run the troubleshooter” option.
- Once you select the keyboard option, the keyboard troubleshooter will open up before you.
- Find the problem with your touchpad and fix it.
Method #3: Enabling Touchpad
Before moving towards other troubleshooting methods, you shouldn’t ignore this one fix. Ideally, this should be the first thing for you to do once you experience a problem with the working of the touchpad on your Lenovo laptop, as it’s important to check whether the touchpad is enabled on your device or not to ensure that the problem is happening because of some software or hardware issue.
Here is how you can check whether the touchpad is enabled on your Lenovo laptop and hit the enable button if it’s not.
- Click the “Start” icon on the taskbar of your laptop and select the “Settings” option.
- Once you are in the “Settings” menu, open the “Devices” option.
- Click to select the “Mouse & touchpad” option.
- Select the “Additional mouse options” to go to Mouse Properties.
- When the Mouse Properties window opens on the screen, select “Devices Settings.”
- From the pane on the right, check to see if the toggle next to “Enable” is turned on.
- If the toggle is off, tap to turn it on.
- Select “OK” at the bottom to enable the touchpad on your Lenovo laptop.

Method #4: Updating the Touchpad Drivers
As evident from the reasons we have explained above, if you haven’t updated the touchpad drivers on your Lenovo laptop for a long time, this could make it stop working on your device. But don’t worry; you can quickly fix this problem by updating the touchpad drivers on your laptop using these steps.
- Go to the official Lenovo website and get the Synaptics Touchpad Driver for Windows 10 laptops.
- Now tap the “Search” bar at the bottom and find “Device Manager.”
- Open Device Manager on your PC and tap the “Mice and other pointing devices” option to expand it.
- Right-click the “Lenovo Pointing Device” or “Lenovo Touchpad” option.
- Click the “Update driver” option.
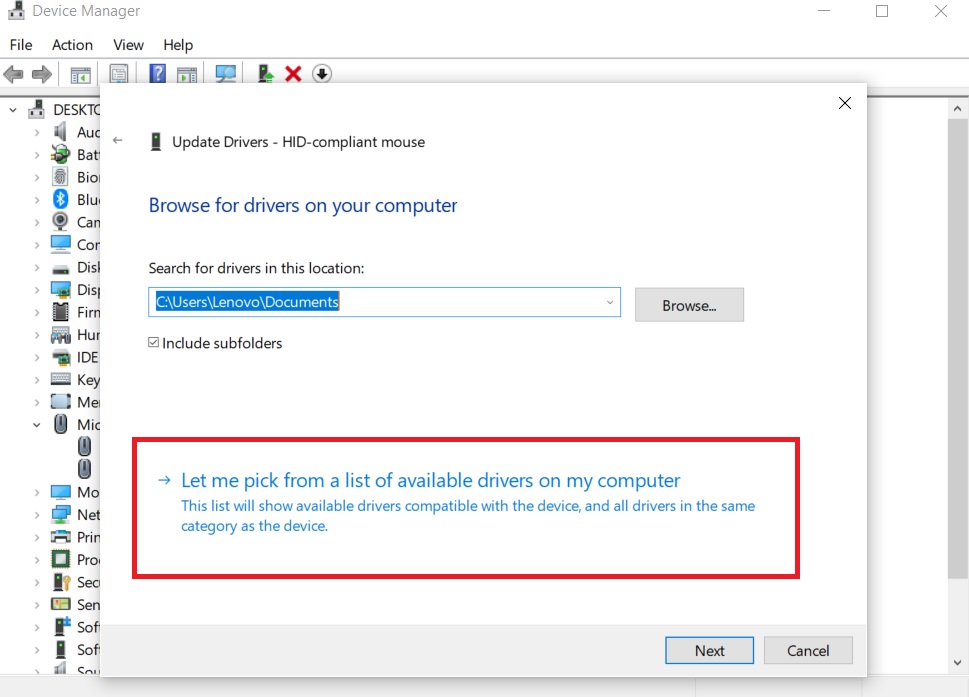
- On the next window, hit the “Browse my computer for driver software” option.
- A new window will pop up on your laptop’s screen. Select the “Let me pick from a list of device drivers on my computer” option.
- Choose the “Have Disk” button from the next screen.
- Select a suitable touchpad driver (the one you have downloaded previously from the Lenovo official website) and get it on your computer.
You have successfully updated the touchpad driver on your Lenovo laptop, which will fix the problem for you.
Method #5: Restoring Default Touchpad Settings
Another thing you can do to fix the Lenovo laptop touchpad not working issue is to restore the default touchpad settings on your device. Doing so will remove all the presets you have configured for the touchpad.
Here are the steps you need to follow to restore the default touchpad settings on your laptop:
- Click the “Start” icon on the taskbar and type “Touchpad Settings” in the search bar.
- Select the first search result to go to the Touchpad settings window.
- Scroll down on the Touchpad Settings window on your screen and select the “Reset your touchpad” option at the bottom.
- Hit the “Reset” option once again to remove any presets for the touchpad.
The default touchpad settings for your touchpad are successfully restored on your device. You can now check for the issue and see if it is fixed now.
You can check out this YouTube tutorial if you have never previously restored your touchpad settings to default.

Method #6: Uninstalling Latest Drivers
Though updating the touchpad drivers on your laptop fixes the issue in most cases, this can sometimes worsen the situation. If the latest drivers you have installed aren’t compatible with the touchpad, you might have to uninstall them and roll back to the previous drivers to see if the issue is resolved.
Follow these steps to roll back to the previous drivers:
- Head to the “Start” menu on your laptop and put “device manager” in the search bar.
- Open the “Device Manager” window and click the “Mice and other pointing devices” option to expand it.
- Choose “Synaptic Pointing Device” and right-click the “Properties” option.
- Head to the “Driver” tab from the top and choose the “Roll Back Drivers” option.
- Once you have done this, restart your laptop and check for the issue.

Method #7: Rolling Back the Windows Update
If rolling back the touchpad driver update hasn’t solved the problem, you have to eliminate the latest Windows update on your device to do the same.
This is how you can roll back the latest Windows update on your device.
- Select the “Start” icon from the taskbar and click the “Update and Security” option.
- From the next window appearing on the screen, select “View update history.”
- Click the “Uninstall updates” option.
- A new window will appear on your laptop’s screen containing a list of all the recent Windows updates on your PC and a date for each update.
- Choose the updates you have installed recently and start uninstalling them one by one.
Once you are done uninstalling all the latest Windows updates on your laptop, restart your PC and see if the issue is fixed.
Here is a YouTube video to help you roll back the Windows updates on your Lenovo update.

Method #8: Changing the Power Management Settings
You can also change the power management settings on your Lenovo laptop to make the touchpad work again on it. Here is how this can be done:
- Navigate to the “Start” menu on your laptop and type “Devie manager” in the search bar.
- Select the first search result to open the Device Manager window.
- Head to the “Mice and other pointing devices” option to expand it.
- Choose the “Synaptic Pointing Device” option and right-click the “Properties” option.
- Select the “Power Management” tab from the top.
- Uncheck the box before “Allow the computer to turn off this device to save power” and hit “OK” to confirm.
- Close the Device Manager and other windows on your device and restart it to check for the issue.
Method #9: Enabling Touchpad from BIOS
Another fix for the Lenovo laptop touchpad not working is to enable the touchpad from the BIOS. Though you have already looked into enabling it on your device, if it’s disabled from the BIOS, you won’t be able to fix the issue.
Here is how you can enable your touchpad from BIOS:
- Hit the “Start” icon and click the “Power” icon on the pop-up window.
- Select “Restart” and wait until your laptop finally restarts.
- While the laptop tries to boot up, hit the “F1” key.
- Head to the “Config” Menu.
- Go to the Trackpoint and Trackpad options and enable them on your device.
- Hit “F10” to save the changes and restart the laptop.
- Once the device turns on, see if the touchpad is working.
Method #10: Adjusting the Touchpad Sensitivity
If the sensitivity of your touchpad isn’t configured the right way, this could make the touchpad stop working on your laptop. However, you can adjust the pressure you want to be applied on the touchpad to make it work again.
To do this, follow these steps:
- Hit the “Win + X” keys on your laptop to open the Run box.
- Put main.cpl in the bar and press enter.
- From the mouse properties window opening up before you, choose the “Ultra Nav or Thinkpad” tab.
- Locate the touchpad settings section and select the “Settings” option.
- Select “Pointers” on the Touchpad Properties window to expand it.
- Hit the “Touch Sensitivity” option.
- Use the screen slider to adjust the touchpad’s sensitivity as per your preference.
- Select “Apply” to save the changes.
You have successfully adjusted the touchpad sensitivity on your laptop, which will fix the problem for you.

Method #11: Disabling the Tablet Mode
If you have been making frequent switches between the normal mode and the tablet mode on your Lenovo laptop, this might have impacted the touchpad’s functioning, eventually making it stop working on your device.
To fix the problem, you just have to disable the Tablet mode, as during the Tablet Mode, your device will only register screen touches, disabling the keyboard and touchpad.
Here is how you can disable the Tablet Mode on your device:
- Open the “Start” menu on your laptop.
- Select “Settings” and click “System” on the Settings menu.
- Choose the “Tablet Mode” option from the left panel.
- Tap the toggle next to “Tablet Mode” to disable it on your device.
- Once done, restart your device and check for the issue.

Method #12: Contact Lenovo Support
If you have tried all the fixes we have mentioned above, and none of them has worked out for you, the problem with your touchpad might be hardware-related.
Don’t worry; the problem might not be too serious. To find out, go to the Lenovo Official Customer Support page and enquire about the issue. You can also take your laptop to a nearby Lenovo store.
Conclusion – Lenovo Laptop Touchpad Not Working?
In this guide, we have listed some of the main reasons that users from around the world have reported regarding their Lenovo laptop touchpad not working issue. We have also listed some simple fixes you can try to solve this problem at home.
Hopefully, one of these fixes has worked for you, and you will be able to enjoy using your Lenovo touchpad all over again. Thanks for reading it to the end!


